自定义中间件
在前面的文章中简单介绍了一下中间件是什么,并简单使用了下中间件,这里就看下如何自定义一个中间件以及需要注意的地方。
先用 cli 新建一个中间件文件
shell
nest g middleware aaa --no-spec --flat执行这个命令会生成一个中间件文件aaa.middleware.ts
ts
import { Injectable, NestMiddleware } from '@nestjs/common'

@Injectable()
export class AaaMiddleware implements NestMiddleware {
  use(req: any, res: any, next: () => void) {
    next()
  }
}因为不知道你的底层框架使用的是 express 还是 fastify,所以这里的参数类型是 any,你可以根据你使用的框架手动去改。一般来说使用的都是 express。
ts
import { Injectable, NestMiddleware } from '@nestjs/common'
import { Request, Response } from 'express'

@Injectable()
export class AaaMiddleware implements NestMiddleware {
  use(req: Request, res: Response, next: () => void) {
    next()
  }
}中间件中使用了@Injectable装饰器,由此看出中间件也类似提供一个服务的提供者。可以在 next()方法的前后加一些处理逻辑,这个会在中间件的开始和结束时候触发。next 方法会把控制权交给下一个中间件。
ts
import { Injectable, NestMiddleware } from '@nestjs/common'
import { Request, Response } from 'express'

@Injectable()
export class AaaMiddleware implements NestMiddleware {
  use(req: Request, res: Response, next: () => void) {
    console.log('brefore')
    next()
    console.log('after')
  }
}使用中间件
上面简单定义了一个中间件, 接下来我们在app.module.ts中使用它。
ts
import { MiddlewareConsumer, Module, NestModule } from '@nestjs/common'
import { AppController } from './app.controller'
import { AppService } from './app.service'
import { AaaMiddleware } from './aaa.middleware'

@Module({
  imports: [],
  controllers: [AppController],
  providers: [AppService]
})
export class AppModule implements NestModule {
  configure(consumer: MiddlewareConsumer) {
    consumer.apply(AaaMiddleware).forRoutes('*')
  }
}启动项目看下执行效果

这里是对所有路由启用,你也可以指定精确一点的路由。先定义几个路由作为区分
ts
import { Controller, Get } from '@nestjs/common'
import { AppService } from './app.service'

@Controller()
export class AppController {
  constructor(private readonly appService: AppService) {}

  @Get('hello')
  getHello(): string {
    console.log('hello')
    return this.appService.getHello()
  }
  @Get('hello2')
  getHello2(): string {
    console.log('hello2')

    return this.appService.getHello()
  }

  @Get('world1')
  getWorld1(): string {
    console.log('world1')

    return this.appService.getHello()
  }

  @Get('world2')
  getWorld2(): string {
    console.log('world2')

    return this.appService.getHello()
  }
}在 app.module.ts 中指定路由
ts
import { MiddlewareConsumer, Module, NestModule } from '@nestjs/common'
import { AppController } from './app.controller'
import { AppService } from './app.service'
import { AaaMiddleware } from './aaa.middleware'

@Module({
  imports: [],
  controllers: [AppController],
  providers: [AppService]
})
export class AppModule implements NestModule {
  configure(consumer: MiddlewareConsumer) {
    consumer.apply(AaaMiddleware).forRoutes({
      path: 'hello*',
      method: RequestMethod.GET
    })
    consumer.apply(AaaMiddleware).forRoutes({
      path: 'world*',
      method: RequestMethod.GET
    })
  }
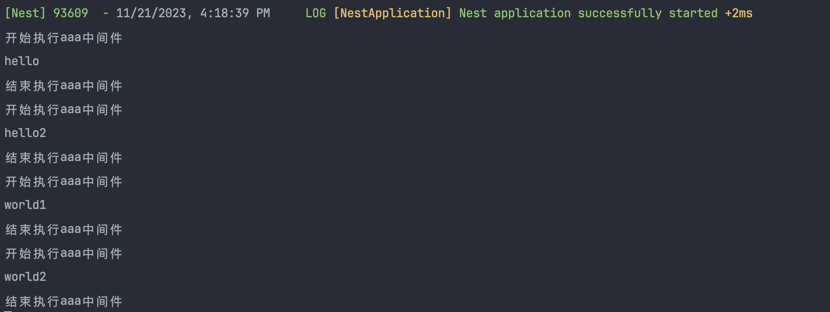
}浏览器访问对应的路由,看下执行结果。

这是中间件的简单使用,但是这样的使用方式和 express 差不多,但是 nest 中装饰器可以是类 class,因为如果是类的话,就可以使用依赖注入来注入服务进行一些逻辑使用。
ts
import { AppService } from './app.service'
import { Inject, Injectable, NestMiddleware } from '@nestjs/common'
import { Request, Response } from 'express'

@Injectable()
export class AaaMiddleware implements NestMiddleware {
  @Inject(AppService)
  private readonly appService: AppService

  use(req: Request, res: Response, next: () => void) {
    console.log('brefore')
    console.log('-------' + this.appService.getHello())
    next()
    console.log('after')
  }
}这里也可以使用构造函数注入,前面有提到过,这里的提供者注入有很多方式,忘记的可以去看看
ts
import { AppService } from './app.service'
import { Inject, Injectable, NestMiddleware } from '@nestjs/common'
import { Request, Response } from 'express'

@Injectable()
export class AaaMiddleware implements NestMiddleware {
  constructor(private readonly appService: AppService) {}

  use(req: Request, res: Response, next: () => void) {
    console.log('brefore')
    console.log('-------' + this.appService.getHello())
    next()
    console.log('after')
  }
}访问下路由看下控制台输出

如果全局使用中间件可以使用app.use()方法,这个就和 express 差不多了。
中间件和拦截器
从表现上看,感觉中间件和拦截器的处理时机是差不多的。但是它俩还有一些细微的区别的。interceptor 是能从 ExecutionContext 里拿到目标 class 和 handler,进而通过 reflector 拿到它的 metadata 等信息的,这些 middleware 就不可以。
再就是 interceptor 里是可以用 rxjs 的操作符来组织响应处理流程的。middleware 里也不可以。
它们都是 Nest AOP 思想的实现,但是 interceptor 更适合处理与具体业务相关的逻辑,而 middleware 适合更通用的处理逻辑。
总结
本文简单实现了自定义中间件的编写和使用,当然在业务中不会有这么简单的中间件。而且也对比了和拦截器的区别,希望对你有帮助。

